Wednesday, 29 June 2016

Fish puppet


Sorry, no instructions or taken while I made it photos, as this was made very quickly while Simon had his morning nap!
It's a puppet, so we can sing along to a favourite song from Barnacles, the toddler group we used to go to in Brighton. Every week we sang a song called Mr Cow by Julia Plaut, all about how the animals on the farm said to God they loved him. Everyone got an animal puppet to wave at the right time. Simon loved it so we downloaded the album God's Wonderful World from iTunes. I wanted to sing it with puppets at home, and being rather a hoarder of puppets I already had Mr Cow, Mr Sheep, Mr Duck and Mr Pig. I managed to buy Mr Horse and Mr Chicken quite cheaply, but nowhere had a fish puppet, cheap or otherwise. I tried looking for a fish wash mitt or oven glove, but no luck. 
So I made this Mr Fish! Here's how...
1-cut two fish shapes from cotton fabric
2- cut scales from felt or fleece. Sew on one of the fish shapes in rows, starting at the tail end so they overlap. Don't out scales right to the edge of the fabric, leave the seam allowance without scales, so they are nicely flappy when you sew it together.
3 - add stripes on the tail
4- add a fin just in front of the scales
5- add a small circle of fleece for the eye, then sew a button on top.
6- on the other fish shape, sew a pocket for your hand (see photo further down) remember to leave the bottom open
7- put the scaly side and the pocket side together and sew round the fish shape LEAVING the pocket unseen so you can turn the fish the right way out.
8- snip the curves and turn the fish the right way out.
9- stuff lightly with toy stuffing
10- stitch up the gap in the fish, making sure not to stitch the pocket shut
11- sing Mr. Cow using the puppets! Yay!
Hopefully now you can see what I mean about a pocket in the back, you just put your hand in and Mr Fish swims around in the pond all day, and says plop, plop, plop! 

Saturday, 14 May 2016

Where on earth have you been?

Ok, so it's been a looking while since I posted on this blog...as in over two years! Do I have an excuse? Well, my creative energy has been going into this little project!


This is Simon who was born last year. He now looks like this!


He is a gorgeous, cheeky guy and takes up a lot of time. There is still time to be creative though.


This is a quilt panel that I stitched into some blue fleece. It's a comfy play mat for the floor. (Excuse the creases, we've been playing on them today!)


This is another play mat, a construction site panel, which was Simon's Christmas present, along with some little vehicles that sing! (Yes, they drive you crazy!)

There are also some clothes I've made, and of course purée!

This is today's project - a sensory bottle, made with buttons, loom bands and glitter. I glued the lid shut, just to be sure!


As you can see, little one was interested!


Here it is in action! Whoopee! I love how the buttons and bands start at opposite ends of the bottle, and all three ingredients take different times to settle! 


Saturday, 8 March 2014

City backpack

I wanted to make a backpack, a small one, suitable to use as a handbag. I found this pattern which was brilliant, really easy to use, with good clear instructions.
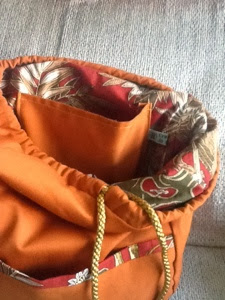
I used up some fabric from my overly extensive stash, using a patterned piece for lining and detail, and orange for the rest. I changed the straps from the original, as I prefer a padded strap, and the handle on the top turned out a little longer than I wanted, but I'm still really pleased with it.
Here's some more photos.

The straps, padded with fleece, and with proper backpack buckles, which are hard to find other than online.
The interior, with an orange pocket, and one of my 'created by Jo Chorlton' labels. I used gold cord for my drawstring.

The front panel was chosen carefully to make good use of the design. I love frogs, so this is the bit I chose. I worked the rest of the pattern round cutting out this piece.

Wednesday, 6 November 2013

Special seam stitches


I'm going to do a post on the stitches I'm using on my USA flag crazy quilt seams, as that's really all there is to do now, apart from backing and binding.

Yesterday I rewatched How to make an American Quilt - which you can buy on DVD from Amazon here

http://amzn.to/1b6D2wU

Towards the end of the film they show the quilt that the character have been working on - maybe this needs a spoiler alert! - but there is a crazy patchwork piece. Despite crying like a sentimental fool by this point in the film, my inner quilter kicked in and I paused the DVD to look at the stitching and discovered a variation of blanket stitch that I hadn't tried yet!

Here it is on my quilt.

So you're thinking 'which stitch?' It's the one at the top of the gingham piece, that forms triangles. It's basically a blanket stitch, so here are some other variations of blanket stitch.


Here (above) the blanket stitch forms a fan shape.


Another very similar stitch is this one that forms a bow.


On this stitch (above) the blanket stitches are crossed over each other.


Here the blanket stitch is worked on alternate sides. 

It's amazing how many variations you can make with just one stitch!

By the way I finished the stitching on the seams tonight! Hurray!


Saturday, 26 October 2013

Meet Bartholomew J Mouse!

Since term began in September I've had less time for making than I would like, but I'm keeping my USA crazy quilt ticking over, and because I made a lot of progress over the summer, I am now on the penultimate stage of doing the blue stitching on the red and white portion. Of course, that's most of the quilt, so it's taking a while. I still aim to be finished by the end of the year!
Then there are the creative distractions, like deciding we needed a mouse puppet to use for the Christmas Eve service at church. Cue some sketching of ideas, and then re-watching of videos on YouTube to remind myself how to make a puppet using the Project Puppet pattern I have. (I'll try  and add links to these at some point, when I'm using a proper computer, and not my iPad!)
The Roly pattern from Project puppet is very easy to use, but has a round head, not mouse shaped. It's what I've used for Crockford, Brookland and Dexter.

Dexter the rock star!

Crockford with two camels...unusual for him as he prefers crocodiles, as he will happily tell you if you spend any amount of time with him!

I obviously had to make a mouse nose shape for this pattern, which I did using a cone shaped piece of paper. I decided to keep the mouse body thin, and his hands and ears big. I went for a grey tail, not pink, as that screams rat, and that makes me scream!
So here he is, posing with me - Mr Bartholomew J Mouse!


I was concerned he'd resemble Roland Rat (yay, hello rat fans!) which, as much as I like Roland Rat wasn't what I wanted. I wanted him cuddlier than Rizzo from the Muppets, and I guess he's turned out a bit like Tutter from Bear in the Big Blue House. I think he's his own mouse though, and I have some firm ideas about his personality.
I have a puppet board on Pinterest, so follow me on that to see what my favourite puppet inspirations are. (here's some clues...one is small, grey and squeaky, and is best friends with a bear, the other is green and has an 'it's complicated' relationship with a pig!)
Just got to write the script now!

Thursday, 1 August 2013

Short burst of speed!

Having posted only last week about the current state of my USA themed crazy quilt, I am now about to post again! This is mostly thanks to the school holidays which means that I am able to get on a little more. (But only a little, as my mornings, a couple of afternoons and a weekend day are taking up with teaching English to foreign students!)
I was very pleased to finish all the red patches, and I made a start on putting the red pieces onto the backing.
As you can see my fabrics are mostly red, with hints of white, and include two fabrics that incorporate other colours. I wasn't sure if this was going to work, so I've just done a small section, and it's only tacked down at the minute. Actually this caused a crafting dilemma for me - all the fabric I've used so far has been from my stash of fabrics. I have only bought thread. I was battling with whether to try and stick with that, hence the fabrics with other colours, and the dominant red, or whether to try and find some white fabric with a red print or pattern. In the end I decided to use what I've got. It looks good, there's variety of pattern, and the white patches really stand out. Crafting can be a very expensive hobby, and I like to try and limit what I buy to stuff that I really need and haven't got in my stash already.
I also started adding the decorative stitching to the blue section of the quilt. My original idea was to use blue and white variegated thread on the blue section, and red and white combined on the red section. (Red variegated thread is inevitably pink...not the look I wanted!) However, when I made a start, I soon realised that you couldn't actually see the stitches. I think it's important that this detail stands out, so now I am using red on the blue section and blue on the red section. As an added bonus it helps the embroidered patches to stand out more.
Here's the first few borders!


Thursday, 25 July 2013

What happened to that quilt you were making then Jo?

Waaaaay back in January I posted about a crazy quilt I was planning to make. It had a USA theme, and was going to be based on the Stars and Stripes. I had given myself the year to make it, and after that initial post I haven't mentioned it on the blog. 

So what happened? 

Well, I am very pleased to say that the quilt is ahead of schedule! I used an app called Priority Matrix to plan the quilt and that's helped me stay on track as I could organise what image I wanted on what colour, and allocate it a month.


As you can see, there are lots of green ticks :D 
So where are all these images? I've used the same process as for the eagle - find an image using Google (what did we do before Google?) put it into Adobe Ideas and turn it into a line drawing.
Print, trace onto fabric then stitch using stem stitch.

Here are the finished blocks. The blue and white ones are now stitched onto the backing fabric, which is an old sheet, along with other blue and white fabric.

Map of the USA
American Eagle
The White House
The Statue of Liberty
Chicago skyline
All the blue patches on the backing fabric.

The red and white blocks are still in progress, I've got one underway and 3 more to do. Then they can be stitched onto the backing fabric. Obviously because of the proportions of the flag, there are more red than blue blocks.
Orchard House - Louisa May Alcott's home in Concord, Massachusetts.
Sitting Bull
Fender guitar
Martin Luther King
American football player
Wolf
Mount Rushmore
Baseball player
Cowboy - I added a lasso.
Buffalo (or bison)
Golden Gate Bridge
Navaho pot in progress - you can see the pen lines, which will disappear over time.

Of course, once all the pieces are sewn on, then I will be adding decorative stitches, as I did to the Green Knowe quilt.

Some of the decorative stitches I used.

I think this may take the rest of the year!